Showing posts with label DIY. Show all posts

Wednesday, June 11, 2014

Garden Architecture - making trellis for vegetables

Making growing spaces for your plants not only helps them produce more, it is also aesthetically pleasing and gives the garden texture and a focal point.  Now I did not design my Community Patch to be a show place.  I am more interested in production, but that does not mean I cannot appreciate that the eye is now drawn to the center of my garden where the tall pole bean pyramid has been located.


Here are some details of the architecture we have now installed in out Community Patch.  We made everything "disposable."  We have to remove everything from the garden at the end of the season, so there is no need to make anything too special.


Raised Bed


For all the details of the raised bed, check out the detailed blog posts I did.  One here on the Community Patch and the other detailing some of the thyme plants on my herbal blog.


Trellis

There are several methods of creating trellis architecture in the garden.  Some are very formal, others not so much.  We have used several different methods.

Cages
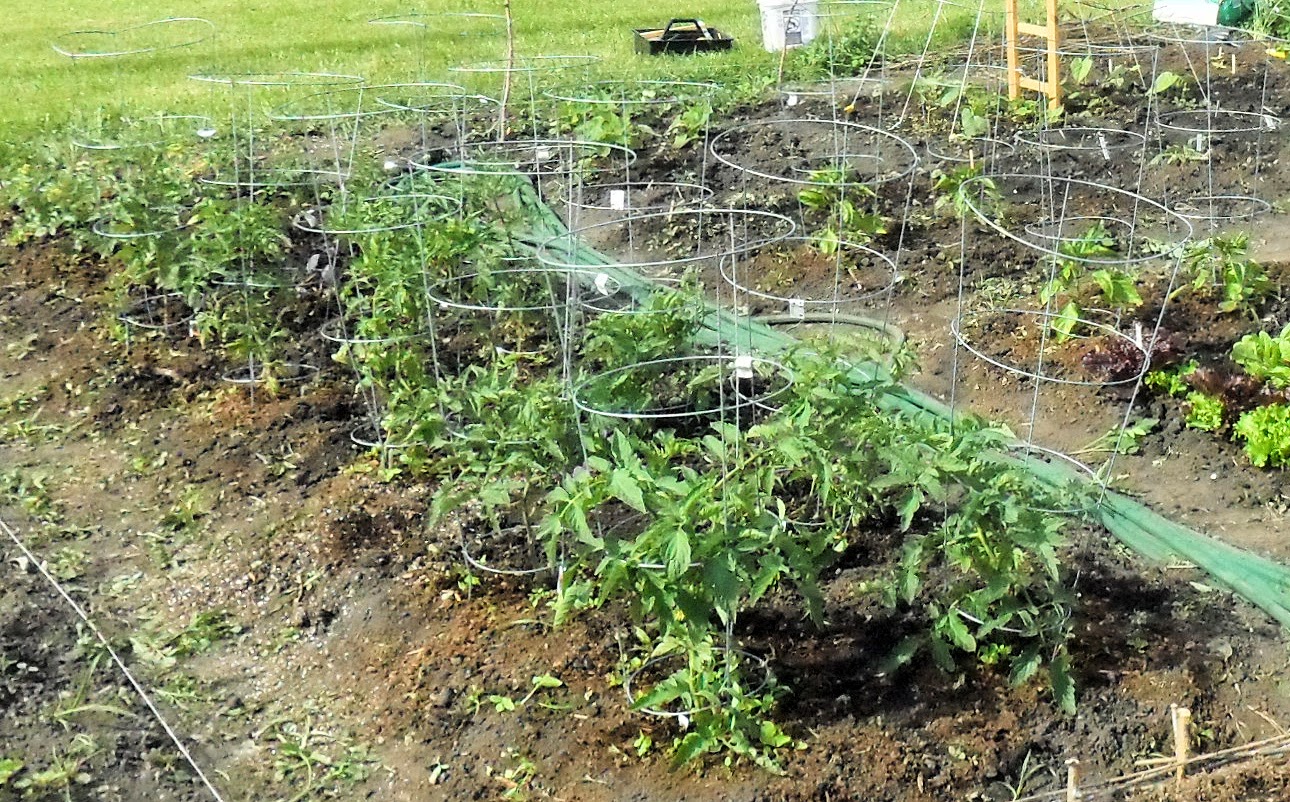
We used simple wire cages, which we purchased at the hardware store, to enclose the tomatoes and peppers and give the support when the fruit will later cause the to topple.

Formed wood Trellis


This is a sturdy form entirely of pine that I nailed together to create a diagonal walk up for the cucumber climbers.  We have two cucumbers so I placed the trellis in between each plant has its own side to climb.

String Frame
peas before the frame
Sometimes all a plant needs it s a place to grow upward.  Peas love a bit of string, so i placed two natural wood sticks int eh ground and strung them back and forth with cotton string.  I will add more rows of string as the plants get longer.

 I did not want to string the entire frame up front because sun will degrade the string over time, so adding new for the top branches every week or so will give better support and longer life to the frame.


Pyramid Trellis


This trellis is for the pole beans.  They need rigid support and something tall to grow on.  They are also planted next to the bush beans so we are going to let them grow above the bush beans planted just the right and left of the center support.

We again used cotton string, this time a twisted triple or quadruple length of string which we held tight to the ground with plastic tent stakes.  In the center is the same style pine frame work we used to make the cucumber trellis.

The pine will weather to gray over the summer, which will be a nice touch!

The final look has three strings on each side for the three dominant pole beans that have sprouted from the seed we planted.

Monday, June 9, 2014

Weekly Update of the Community Patch 6-8-14

This weekend was architecture days!  After the success of the raised bed, I was emboldened to finally put in the trellis materials the vegetable plants needed. So on Saturday I installed (with help from hubby) three different structures for the vegetables to grow on.

Here is the garden this week:


Here is week one (for comparison):


This week the big additions were the raised bed for the thyme, the trellis for the cucumber, the string frame for the peas and the rope pyramid for the pole beans. I detail these items in another post on Wednesday..

Additionally the plants are beginning to bush out, flower and bear fruit.  We have green peppers, hot peppers forming, flowers on the acorn squash and tomatoes, and we were able to harvest greens for a salad this week.  To taste the first fruits is a wonderful experience.  Look to the bottom for a recipe for dressing I made to go on the greens.

The greens are doing very well and we were able to cut some of all of them to eat.


We finally have neighbors.  I guess the person who originally took the space next to mine had to decline and someone new has moved in, but she has a lot of weed work to do.  You can see she is slowly working her way from the back to the front and has a patch already cleared.


The melon and the zucchini were both attacked by the cucumber beetles, so I was glad that I waited to thin them until  later as a few plants were so eaten they had to be removed.

Melon plants thinned to 2 inches apart.

three sunflower crowding each other
I also thinned the sunflower.  Originally I planted three seeds in a hill to see how they germinated.  In one hill nothing came up, but in each of the other three hills, at least two plants came up.  This week I thinned each hill down to the strongest heartiest plant.

Thinning is a fact of growing from seed and if you do not do it, you get weak thin plants that cannot support fruit or die in the middle of the season, so bite the bullet and thin the seedling.  I usually wait until after the plants have formed to real leave.  the first leaves out of the seed are usually round and indistinct, but the second set or real leaves, are the shape of the proper leaves for the plant.

You can see the plants I plucked out were not as healthy as the one I chose to leave.

But the one left I in each hill I expect to get 2 to 3 feet tall and give me lots of sunflower seeds!
thinned sunflowers

Saturday, June 7, 2014

Final Garden Layout - Community Patch

Well I had a design plan.  Something I worked on for several weeks before going out into the garden.  I have to admit, I knew that this plan would change at planting time -- I was right.  I started planting hearty plants on May 18.  Added more seed and a few other plants on May 26 and finished with Zinnia seed, Dalias and herb seedlings and basil plants on May 31.  The I added lavender and more basil on June 3.  At which point there is not much space left to plant.  However, the patch next to mine (71) is empty and neglected, so if I do find more plants I want to grow, I may start planting them over there!

Plan on a clip board for reference on planting days

Here is the original hand written plan:


Here is the final version of that plan:

I have officially run out of room (I think) so there is little I can add to the plan now.  The first compromise was I bought more tomato plants than the original plan called for.  As a result this took the space for musk melon and zucchini, so I had to move them.  However I decided not to give the tomatoes a full 3 feet of space, going instead with the recommendations of the square foot gardening book and giving them a bit less space and caging them right away.  I will keep them trimmed and hopefully not regret this decision.

I added more paths to the garden than the original plan called for as well.  I realized how unrealistic I was being about walking in the soil as I began to plant things into the space.  I still may regret not adding one more path through the middle of the vegetable patch, as I am already having access issues.

There is much to tell about each of these plants, so I will focus on each one separately in other posts and then link them back to this one as they are written so you can just bookmark this post if you want to know the details of the plants.

Here is a breakdown by bed of the plants (the bolded letters are those used on the garden plan):

Thyme Bed
French Thyme
German Thyme
Silver Thyme
Golden Lemon Thyme
Common Thyme
Doone Valley Thyme
Lemon Thyme

Herb Bed
Kentucky Colonel Mint
Tri Color Sage
Common Sage
Dill
Hyssop
Parsley
Cilantro
Summer Savory
Greek Oregano
Fennel
Bronze Fennel
Sunset Hyssop
Tarragon
Spearmint
Calendula

Tomato Bed
Early Girl
Better Boy
Roma Tomato
Mortgage Lifter
Cherokee Purple
Pineapple Tomato
Sweet 100 Cherry
Grape Tomatoes
Sweet Basil

Salad Bed
Red and green early greens
Micro Greens (from seed)
Red Rib Sorrel
Collard Greens (from seed)
Red Giant Mustard
Arugula
Butter Crunch lettuce
Tiburan Poblano Peppers
Jalapeno Peppers
Root Celery
Broccoli
Yellow Spanish Onions (I think they all died)
Zinnia (Flower from seed)
Lemon Basil

Vegetable Bed
Burp-less Cucumbers (climbing)
Bush Salad Cucumbers
Sunflower Teddy Bear (Seed)
Better Belle Peppers
Black Beauty Zucchini (seed)
Hale's Best Jumbo Muskmelon (seed)
Dwarf Gray Sugar Peas (seed)
French Filet Bush Beans
Tigers Eye pole Beans
Christmas Lima Beans (Climber)
Dalhias (3 plants as an experiment)
Acorn Squash

Saturday, May 24, 2014

Populate more Plants by Layering

I have a 20 x 20 community garden.  I purchased a number of plants, but being on a budget I wanted more plants than I could buy.  Several ways to handle this are to grow from seed, make cuttings from existing plants, or layer existing plants to create 'children.'

Italian Oregano  (Origanum x majoricum)
When I was planting the oregano I noticed that it had gotten a little leggy.  The late start to the season this year meant that plants stayed in small pots on the patio waiting to be planted far longer than normal.  In the case of the oregano instead of a compact low growing plant you normally see, it had long branches.  I decided I could use this "stretching," as it is called to my advantage by taking the legs or branches of the plant and rooting them to create new plants.  This technique is called layering.

Layering

Layering is taking the branch of an existing plant and without cutting it from the mother plant, bury it in soil and allow it to create a new root system.  Later you cut it from the mother plant and have a new plant you can transplant to another location in the garden.  The oregano with its long branches was perfect for this.  I planted the plant at an angle so the long branches laid along the soil.  I chose two longer healthy branches to use for layer and trimmed off the other long branches.  I used the clippings to make spaghetti sauce with that night.

You need a sharp knife or blade to do layering and sometimes a device to hold the branch down against the soil.  I keep my clippers very sharp for cutting herbs so this was the perfect tool to use for this task.  I made a slit in the bottom side of the branch.  The slit was then laid in the dirt and covered with soil.


Because the soil is rich and dense and the plant was placed at an angle to begin with, I did not need anything to hold the branch down in the soil.  However, if you are using an established plant and bending the branch down to the soil against its desire to reach toward the sun, a bit of help will be needed to hold the plant down.  A bent paperclip or hairpin work wonders.


I chose to layer two different branches on this oregano plant.  Once the soil was in place I gently watered it, being careful not to wash away the soil covering my cut area.   I then trimmed all the reaming long branches to keep the plant bushy and to give these two longer branches less competition for nutrients.  Still connected to the mother plant, these branches will get extra food from that plant until they develop a root system of their own.  This should take about 2 weeks.  It is important to keep the soil moist to encourage the root growth.


You can see the two branches lying in the soil and the mother plant, now trimmed.  In a week I will revisit this so you can see the signs it is working.

More about Italian Oregano

  • Light: Full sun to part shade
    Type: Perennial in zones 5 to 10
    Planting time: Spring, fall
    Features: Strongly aromatic and flavorful, dark green leaves, small white flowers
    Soil: Moist but well drained, pH 6.5 to 8
    Plant spacing: 12 to 18 inches apart
    Plant size: 12 to 18 inches tall
    Garden use: Herb garden, containers
          Plant use: Major ingredient in Italian cuisine

  • Savor classic Italian cuisine with the flavorful leaves of this oregano. An easy-growing plant for the garden or container, Italian oregano hails from the Mediterranean region. It thrives with lower humidity and well-drained soil. In the garden, use this oregano as an edging plant. Plants spread when happy, rooting along the stems. Harvest leaves or stems anytime during the growing season. Flavor is most intense just before plants flower. Trim plants often to keep flower formation at bay.

Friday, May 23, 2014

How to plant nursery plants

Most of the plants I placed in the garden came from a nursery.  I also have some winter sown seedlings that I will plant next week so i will talk about those then.  I also am going to grow some plants from seed.  That discussion will be in a day or so.

For today we are going to talk about how to give a nursery plant a good home so it will thrive in your garden.


These are the plants.  I obtained them from four places.  A couple I acquired at the Home Depot.  These are in peat pots from Bonny Plants.  I got basil and lemon balm on a whim when i was searching for a new patio pot.  Most came from the Herb and scented plant sale at the Oak Park Conservatory.  The Herb sale is their big fund raiser, although they do not have many herbs anymore I still support the sale and there are a few items you can only get there which I return each year for.  Several of my tomato plants, a few herbs and the cucumbers all came from the Conservatory.  I stopped at the Good Earth Nursery on my way home from the herb sale and got a few heirloom tomatoes, root celery, and a couple more herbs plants.  Luurs Garden Shoppe, which is my local nursery, less than two miles from the apartment is where I always get my potting soil, compost and other supplies like that, I picked up several thyme plants from them.  They stock an amazing selection of perennials and I cannot wait to shop there when I finally move out of the apartment!  I also won 4 broccoli plants at the garden club meeting in April.

So first things first.  The soil must be ready to be worked.

I laid out the garden with the plants still in their pots to make sure there was space.  I referred to notes, plant stakes and my own research to determine plant spacing.  Once I knew where I was placing the plants then I could dig holes.  Never take the plants out of the pots and leave them laying on the ground with bare roots.  They will dry out so quickly in the sun and the stress to the plant can be catastrophic.  All plants suffer from transplant shock adding dry roots to that and you can kill some less hardy plants.


Using a trowel or shovel, I like a hand shovel, dig a hole that is twice the size of the root ball of the plant you are planting..  This is my ergonomic shovel and I can dig with this all day without straining my wrist.  I admit this is an older tool, I have had it for years using it in my herb garden.   Use a ruler to measure over from the center of the hole to make the next hole when planting multiple plants. 


Toss a handful of compost into the bottom of the hole and water the hole liberally. This is a pepper plant so I just added some mushroom compost.  Organic materials like peat moss, composted grass clippings or plant material would also be perfect.  You just want to give them a bit of a food boost.


Then plant the plant, firming the soil around the plant with your hands enough to keep the plant upright and  the soil from washing away from the plant when it rains or the plant is watered, but not so firm that you press out all the air pockets around the plant.  Remember plants breathe from the roots so spaces in the soil for air are needed. Water the plant well after planting, then move to the next plant.  This is a bush cucumber.  

I place the plant tags that came with the plants in the soil near them.  I will eventually replace these with a larger, easier-to-read tag, but for now, it will keep them identified and allow me to remember what is what.  If it did not have a nursery tag, I wrote the name of the plant on a Popsicle stick and put that in the ground instead.

I put a top dressing of peat moss around the plants as a first layer of mulch to help the soil hold moisture.  I may add more mulch later.  I am waiting to see how the soil sheds water and if I need mulch for weed control. There is a lot of "unknown" in a Community Garden the first year.  In your own yard you will have a better grasp of the soil needs and quirks.

That is it, there is no other technique needed to plant these vegetables and herbs.  Just keep in mind that certain plants, like squash, are grown in a hill rather than on flat ground.  You mound up the dirt and place the plant in the center of the hill or if growing from seed you place three seeds in a hill and thin to one plant once they germinate and grow.

Here are  three planted hills of Zucchini.  I am growing that from seed.

Next time I will demonstrate layering.
.

Thursday, May 22, 2014

Garden Planted!

I had a plan to plant on May 9.  Instead we had downpours that resulted in soil too wet to plant in.  Then I had to wait a week due to a turn in the weather.  I was finally able to plant on Sunday, May 18.  It was in the 80s that day, but had been cold and snowing just two days previous.  It was still a risk to put plants in the ground with our changeable weather, but I went ahead and planted plants and seeds in an all day marathon.

Time wise (so you can compare)  I was able to get the plants and seeds in the garden in about 3.5 hours.  I started around 10 am and worked until about 1:30 with a break for lunch around noon.  That included planting and watering.  I spent another hour on that day placing some peat moss around some of the plants and rewatering so that would not blow away.

I had to rake out the weeds that were sprouting int he space, but did not need to till the soil,m as the park district did that.

Here are some images of the work:


Plot #72 with a few planting areas marked with flour.
The final garden plan (as designed)  This is subject to change during planting, but I had a rough idea of what I wanted to do using this plan I created in advance.
Tools: shovel and rake; watering cans; hand tools including trowels, hand rake, and ruler; plant markers, clip board with plan; brown paper bag with seed packets; cooler with water and snacks.
The plants mixed in two flats and an extra two cardboard boxes
The first thing I did was mark the handle of my rake with markings ever two inches for 1 foot, then 6 and 12 inch increments after that.  Now I just lay it down on the ground and  can easily space plants.

You can see how close the RR tracks are!  This is before work began, nothing raked or placed.

After raking a good portion of the plot (20 feet by 20 feet) I then placed out the plants based on the plan to see if everything would fit as desired.
We have way more tomato plants that originally planned, so that changed the diagram.  We also put in a few more paths that I planned too to make it easier to get in and take photos for future blogs.

That portion int he middle which is not raked is for seeds I did not intend to plant on that day, so I chose not to rake it until I was finished planting the other areas.

Here is a sneak peak of the completed planting, I will provide details of the how we got to this point in another post.


Thursday, March 20, 2014

What can you do in a Community Plot?

We have just signed up for a community plot in Elmhurst.  They are located in Golden Meadows Park, not far from East End Park and near the Union Pacific Rail Road tracks.


This will be the season to prove just what can be grown in a 20 x 20 plot and what you can do with it.  We are going to plant a combination of herbs and vegetables and perhaps a few flowers.

We have a Kickstarter you can donate to that will provide you with some of the bounty from this garden even if you do not live nearby.  For details check this out.

We will post hear at least weekly with progress, recipes, ideas to try and facts about the work in the garden.

We will also share what we learn, not only here but in public programs and through community events.  We may even have a naming contest for out little patch.

So check back often to see what the Community Patch is up to.

Next week I will provide more details about myself, my hubby and the plot once we get to choose its location!

community garden plots courtesy of the Elmhurst Park District